Pair
(Ohms)

Can I get a decent spark from junk I've already got in the garage? I happen to have a 5-pin automotive relay and a flyback and a 9V battery and some wire and a DVM and ...
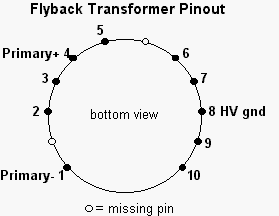
I bought my flyback transformer for a couple bucks from an electronics surplus place. It was designed for some type of CRT tube but I don't know if it was designed for a TV or computer monitor. Usually, people scavenge the flyback from an old TV or computer monitor. A search of the web didn't turn up the wiring diagram or pigouts for this particular flyback but it appears to be very similar to HR8457 from here.
To identify the ground for the high voltage winding the negative terminal of a 9V battery was connected to the high voltage lead and the voltage at pins 6 - 10 on the bottom of the transformer was measured. All the pins gave a 25mV reading except pin 8 which read 5mV, indicating that pin 8 is the HV ground.
Usually, in a flyback transformer the primary winding is isolated from the other windings. Using a digital volt meter (DVM) the resistance was measured between every pair of pins on the bottom of the flyback transformer. The only pins that conducted to no more than one other pin are pins 1 and 4. This suggests that pins 1 and 4 are the primary winding.
| Pin Pair |
Resistance (Ohms) |
 |
| 1-4 |
0.7 |
|
| 2-3 |
0.5 | |
| 2-5 |
0.7 | |
| 3-5 |
0.5 | |
| 6-7 |
0.6 | |
| 6-9 |
0.6 | |
| 6-10 |
0.6 | |
| 7-9 |
0.5 | |
| 7-10 |
0.5 | |
| 9-10 |
0.5 | |
| All other pin pairs were non conductive. | ||
This type of flyback transformer has several high voltage diodes in the high voltage output. In other words, the output is rectified. This means that the polarity of the primary makes a difference. To determine which of the two primary pins is positive a 200uA mechanical ampmeter was connected between the HV and pin 8. A 9V battery was then briefly touched to pins 1 and 4 and the magnitude of the current pulse on the amp meter was noted. The amp meter deflects significantly more when the pin 4 is the positive and pin 1 is the negative. (I wouldn't try this with a DVM since the output voltage may well be much greater than what a typical DVM can handle.)
Briefly connecting then disconnecting a 9V battery to pins 1 and 4 gives a small spark between the HV lead and pin 8. So, for this flyback transformer the primary is pins 1 and 4, with 4 being the positive. The HV secondary is the HV output lead, with the HV lead being positive, and pin 8.
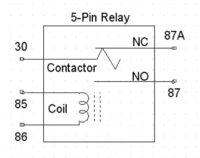
5-pin automotive type relays contain a solenoid and a switch with a pair of contacts. Usually, the pins are numbered on the body of the relay and often there is even a small schematic of the internal wiring. There are a couple different pin layouts, the pin layout and wiring diagram for my relay are shown below.
Typical 5-pin relay
schematic
symbol: |
|
Pin
location for my relay
(bottom view): |
My relay is rated at 12V at 40A and the resistance of the coil is 70 Ohms.
To get a flyback transformer to generate a high voltage we need to pulse the current into the primary winding. To generate the pulses I wired the relay as a "buzzer". In a buzzer, the current for the relays coil is delivered through the "normally closed" (NC) contact within the relay. When power is applied to the relay current flows through the contactor, then the coil, then back to the battery. Since the coil is energized it pulls the NC contact open and closes the "normally open" (NO) contact. When the NC contact opens the relays coil is turned off and the contactor returns to the NC contact and the cycle is repeated. The relay cycles on and off and buzzes, hence the name. With a 9V battery as the power source, this particular relay buzzes with a fairly high pitch, probably greater than 1KHz.
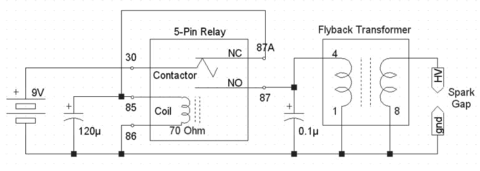
A schematic of my wiring between the buzzer and the flyback transformer is shown below.

A 120uF, 300V photo capacitor (salvaged from the flash unit of a disposable camera) was added across the relay's coil to hold the relay in the "on" position for a longer period of time during each cycle. With the cap the cycling rate of the buzzer drops into the 100~200Hz range. An 0.1uF, 600V capacitor was wired across the flyback's primary to protect the contacts in the relay from arching. Power was from a standard 9V battery. A fresh 9V battery will supply a couple amps, mine is getting pretty old and the voltage has dropped to about 7.5V and it will only supply 1.3A.
This circuit will produce sparks about 1/4" long between a pair of sharp electrodes so the output voltage appears to be about 6KV. The spark is fairly weak and difficult to see in bright light.
I've tried several modifications to the above circuit;
Questions, comments, critiques, flames ... send me an email.
Last Modified: 15 April 2008